Nucleus Migration Guide
If you're setting up Nucleus, and your Roon Server had previously been running on Mac, Windows, or Linux, you'll need to migrate your Roon database. Your database includes your playlists, edits, play history, tags, settings, and more. This guide will walk you through the process.
Step 1: Backup Your Database
In order to migrate to Nucleus, the first step is to backup your database. To do this, we strongly recommend you connect a USB drive directly to your existing server, or use a NAS or other network storage device on your local network.

While Dropbox is a good way to keep an incremental backup in the cloud, we don't recommend it for this migration, as you will be transferring an entire copy of your database, and Dropbox will be significantly slower than USB or network storage)
If you already have a scheduled backup
- If you've already scheduled Roon to backup to local or network storage, go to the Backup tab of Settings
- Click Scheduled Backup
- Click the "three dots" and select "Force Backup Now"
- When the backup completes you should see "Last Successful Backup" at the bottom of the Window
- Shut down your Roon Server

If you would like to create a new backup
- Go to the Backup tab of Settings
- Click the "Backup" button next to Backup Now
- When the backup completes you should see "Last Successful Backup" at the bottom of the Window
- Shut down your Roon Server

Step 2: Restore Your Database
Now that your Roon database is fully backed up, it's time to copy it to Nucleus. To Restore Your Roon Database To Nucleus:
- Ensure the backup you created above is accessible to Nucleus
- If you backed up to a USB drive, connect it to Nucleus (recommended)
- If you backed up to network storage, ensure you know the address, log in, and password for your NAS or network storage device
- Connect to Nucleus by launching Roon on any Mac, Windows PC, iPad, or Android tablet and selecting Nucleus from the "Choose Your Server" screen
- We don't recommend using an iPhone or Android phone for this process
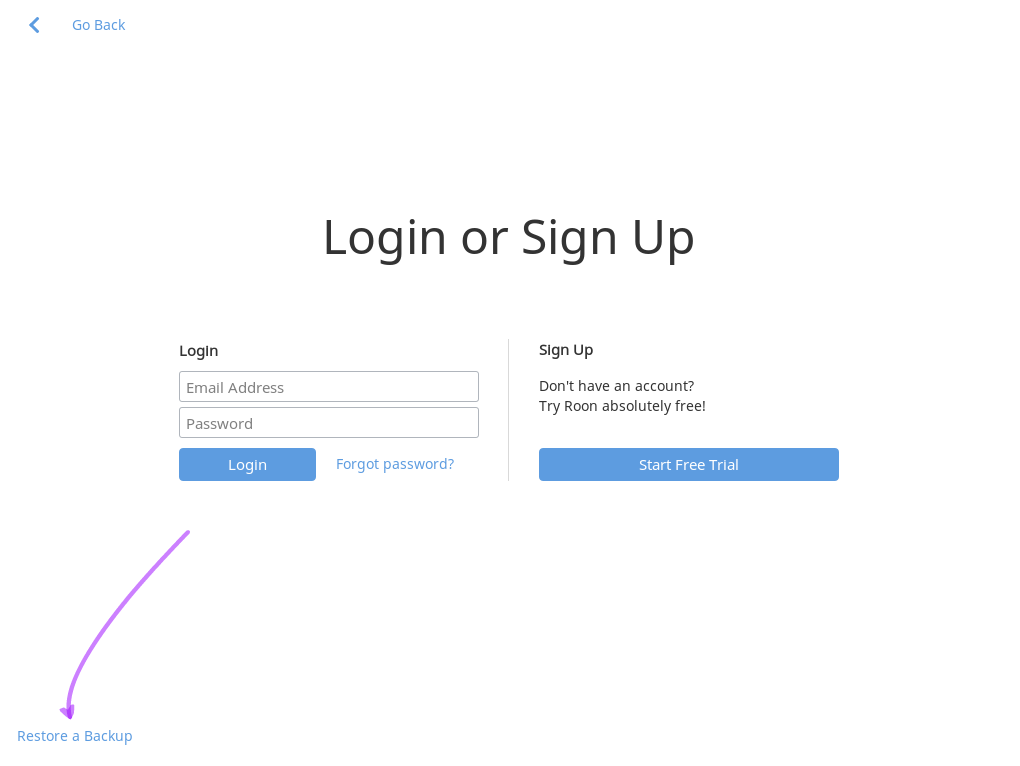
- Since this is your first time launching Nucleus, you will be asked to log-in when you connect. Instead of logging in, click "Restore A Backup" in the lower-left hand corner
- Use Roon's file browser to locate the `/RoonBackups` folder you created in Step 1
- If you created a USB backup, it should be connected to your Nucleus and you can navigate to it
- If you backed up to network storage, you can find the RoonBackups folder by clicking Add Network Share and entering the details for your NAS
Step 3: Configuration
There are a few other considerations once your database has been restored to Nucleus.
Storage
In some cases you will need to re-configure Roon to find your storage devices. It is important that the proper steps are followed when migrating your media library to ensure that your edits and plays are not lost.
USB Storage
If you're using the same USB storage as your previous setup, you may need to update the path. Make sure that you *edit* the existing path if needed. Adding a new storage configuration without removing the old configuration can cause file identification issues.
NAS Storage
If your previous storage location was being accessed over the network, no changes should be required.
Internal Storage
If you're moving your library to the internal storage of Nucleus there are some additional steps that need to be taken to ensure that you library properly migrates with all edits in place. If you need help formatting your internal storage, please see our
article on the subject.
- Go to Settings > Storage and disable all current watched folders *except* Internal Storage. To do this, select the 3 dots next to the storage location and then choose Disable.
- Access the Web Administration Interface and stop the Roon Server Software.
- Copy your files to the internal storage of Nucleus.
- Once the transfer is complete, return to the Web Administration Interface and restart the Roon Server Software.
- Roon will go through the process of identifying the files from your Internal Storage and match them to your existing Roon library.
Audio
Network audio devices (such as RoonReady devices, Roon Bridge, Squeezebox, HQPlayer, etc) should work without any further changes after restoring. If you previously had an audio device directly connected to the machine running your server, you can connect that device to Nucleus and configure it like normal. If you'd prefer to keep the audio device connected to the machine that was previously running your server, you can also install Roon Bridge on that machine in order to make it accessible to Nucleus over your network.
License
Your Roon license can easily be transferred between devices. If you need to log in after restoring your backup to Nucleus, your license should automatically be transferred over, or you will be prompted to move it over.
Previous Server Machine
Once Nucleus is up and running, you may want to continue running Roon as a remote on the Windows or macOS machine that previously ran your server. In that case, we recommend renaming or deleting the Roon database folder on that machine. You can find the
Roon database folder here.

Please make sure you have a backup of your database before deleting it
Related Articles
Nucleus Manual
Introduction What is Nucleus? At the heart of every Roon system is a Roon Server. This is the brain behind the entire Roon experience – it manages your music collection, streams to your audio devices, and stores the Roon database. Nucleus was ...Connecting to Nucleus
Find the Nucleus on your network To find the Nucleus on the network, install the free Roon app on any Mac or Windows PC (available here) or the Roon Remote app for Apple iPad or Android Tablet (available from the App Store and Play Store, ...Nucleus Web Administration Interface
Connecting to the Web Administration Interface You can use a web browser to perform operations like configuring settings, updating firmware, formatting internal storage, and resetting to factory settings. To use Roon to help you load up the Nucleus ...Nucleus Media Storage And Audio Devices
Storage Devices Roon can watch multiple storage locations for files at the same time. That means you can simultaneously use any (or all) of the following storage locations: Devices connected directly to Nucleus by USB If your music is stored on an ...Nucleus Internal Storage
Nucleus supports placing an HDD or SSD into its case, to create a fully contained solution. If you chose to use an SSD here, the system will stay fully silent. The drive needs to be formatted using the Nucleus web administration interface before it ...
Visit the Roon Community!
Need help? Thousands of Roon subscribers and audio enthusiasts are chatting over on our community site right now, join them! You don't even need a Roon subscription to sign up.